Drones have revolutionized how we capture the world, offering breathtaking aerial perspectives and smooth, cinematic footage. At the heart of this visual magic lies the gimbal, a sophisticated three-axis stabilization system that keeps your camera steady, even as your drone navigates challenging winds and maneuvers. However, encountering a “Gimbal Overload” error can quickly bring your aerial adventures to a halt, turning excitement into frustration. This comprehensive guide, crafted from over a decade of hands-on drone experience, will walk you through understanding, troubleshooting, and preventing this common drone issue, helping you get your camera back to its silky-smooth best.
What is a Gimbal Overload Error?
|
Our Picks for the Best Drone in 2026
As an Amazon Associate I earn from qualifying purchases.
|
||
| Num | Product | Action |
|---|---|---|
| 1 | Drone with Camera - Drone with Screen on Controller for Beginners, Foldable Remote Control Quadcopter with Gesture Control, 3D Flip, One Key Start, Emergency Stop, 2 Batteries, Easier to use to use |

|
| 2 | Drone with Camera 1080P HD FPV Foldable Mini Drone for Beginners Kids Adults, Drone with One Key Take Off/Landing, Gesture Selfie, Altitude Hold, 3D Flip, Easy to Fly, 2 Batteries, Toys for Boys Girls |
|
| 3 | Drone with Camera for Adults 4K, Brushless Motor Drones for Kids Beginners, 60 Mins Flight, 130° Lens, FPV Foldable RC Quadcopter, Gesture Photography, Toys Gifts for Teen Boys Girls, Black |
|
| 4 | DJI Mini 3 Fly More Combo (DJI RC), Drones with Camera for Adults 4K, 3 Batteries for 114-min Flight Time, Vertical Shooting, 32800ft (10km) Video Transmission, Lightweight Mini Drone for Beginners |
|
| 5 | DJI Mini 4K, Drone with 4K UHD Camera for Adults, Under 249 g, 3-Axis Gimbal Stabilization, 10km Video Transmission, Auto Return, Wind Resistance, 1 Battery for 31-Min Max Flight Time, Intelligent |
|
| 6 | Drone with Camera, Drones for Adults and Beginners, 1080P HD FPV Foldable Mini Drones for Kids, with 2 Batteries, Carrying Case, Trajectory Flight, Gravity Control, One-Key Takeoff/Landing, 360° Flip, Toys for Gift |
|
| 7 | GPS Drones with Camera for Adults 4K, FPV Drone Under 249g with Brushless Motor, GPS Auto Return, Follow Me, Circle Fly, Waypoint Flight, Foldable Drone with Gesture Control, 46Mins with 2 Batteries |
|
| 8 | Drone with 1080P Camera - Foldable Remote Control Quadcopter with Gesture Control, 3D Flip, One Key Start, Emergency Stop, 2 Batteries, Easier to use, Toy for Kids Adult Beginners |
|
| 9 | DJI Air 3S Fly More Combo (RC 2 Screen Remote Controller), Drone with 1" CMOS Wide-Angle & Medium Tele Camera for Adults, 4K/60fps, Omnidirectional Sensing & 3 Batteries for Extended Flight Time |
|
| 10 | DJI Mini 4K Camera Drone Combo, Drone with 4K UHD Camera for Adults, Under 249 g, 3-Axis Gimbal Stabilization, 10km Video Transmission, Auto Return, 2 Batteries for 62-Min Max Flight Time, QuickShots |
|
A gimbal overload error signals that the drone’s gimbal motor is under excessive stress or resistance, pushing it beyond its normal operational limits. Think of the gimbal as the drone’s delicate wrist, constantly making micro-adjustments to keep the camera level. When it encounters too much resistance, its motors strain, triggering an error message in your drone’s app. This typically results in a shaky, unstable camera feed, making it impossible to capture usable photos or videos. Understanding the root causes is the first step toward an effective solution.
Common Causes of Gimbal Overload
The “Gimbal Overload” message isn’t a single problem but a symptom of various underlying issues. Identifying the specific cause is crucial for a successful fix.
- Physical Obstructions: This is arguably the most frequent culprit. Tiny pieces of debris like dust, sand, grass, or even a stray hair can lodge themselves in the gimbal’s delicate moving parts, creating resistance. Failing to remove the gimbal protector or a protective sticker before powering on the drone can also severely impede movement.
- Improper Transport or Handling: Transporting your drone without proper padding or with the gimbal guard still attached can exert undue pressure on the motors, leading to strain or misalignment. A hard landing can also misalign the gimbal components.
- Software and Calibration Issues: Corrupted firmware updates or simply an uncalibrated gimbal can confuse the drone’s control logic. If the gimbal’s sensors are not properly calibrated, they might misinterpret its position, leading the motors to overcompensate.
- Third-Party Accessories: While enhancing your drone’s capabilities, certain third-party accessories like heavier camera filters or wide-angle lenses can add extra weight, causing the gimbal motors to work harder than intended and leading to an overload.
- Mechanical or Hardware Failure: Unfortunately, sometimes the problem lies deeper within the drone’s mechanics. Worn-out motors, faulty internal wiring, or structural damage from a crash can lead to consistent overload warnings, even after basic troubleshooting.
- Environmental Factors: Attempting to take off or land on an uneven or dusty surface can expose the gimbal to foreign particles or cause it to strike an object, initiating the overload error.
- Aggressive Flight Movements: While flying in Sport mode can be exhilarating, extremely aggressive control stick movements can sometimes push the gimbal’s adjustment limits, especially if combined with other minor issues.
Step-by-Step Guide: How to Fix the Gimbal Overload Error
Don’t panic if you encounter this error. Many “Gimbal Overload” issues can be resolved with simple troubleshooting steps.
1. Power Off and Conduct a Thorough Visual Inspection
The first and most critical step is to power off your drone completely and remove the battery to ensure safety. Then, gently inspect the gimbal area.
- Check for Debris: Use a flashlight to meticulously search for any dust, sand, grass, hair, or small particles obstructing the gimbal’s movement. A soft brush, an air blower, or even a straw can help gently dislodge any foreign objects.
- Gimbal Guard and Stickers: Confirm that the gimbal protector and any protective stickers on the gimbal axis arms have been completely removed. Attempting to power on or fly with these attached is a common cause of overload.
- Physical Damage: Look for any visible signs of damage, such as bent arms, loose components, or cracks. Even minor impact damage can cause misalignment.
- Power Cycle: After inspecting and clearing any obstructions, reinsert the battery, power on the drone, and observe the gimbal’s initial calibration movements. Sometimes, a simple power cycle can clear temporary glitches.
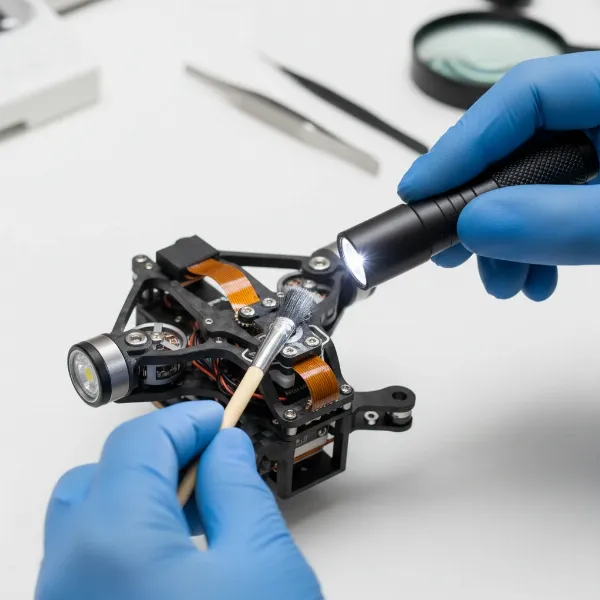 A close-up image of a drone gimbal with a person inspecting it for debris with a flashlight and a soft brush, focusing on the delicate moving parts in a clean, well-lit environment, showcasing precision and care.
2. Perform a Gimbal Calibration
Gimbal calibration resets the gimbal’s internal sensors and motors, often resolving minor misalignments or software-related glitches.
- Preparation: Place your drone on a perfectly flat, stable, and level surface. Ensure it’s away from strong magnetic interference.
- Access Calibration: Open your drone’s flight application (e.g., DJI Fly app). Navigate to the settings, usually under “Control” or “Gimbal,” and locate the “Gimbal Calibration” option. Select “Auto Calibration.”
- Follow Prompts: The app will guide you through the process. Keep the drone stationary until the calibration is complete and you receive a “calibration successful” message.
- Test Flight: After successful calibration, test the drone in a safe, open area to see if the overload warning has disappeared and the camera movement is smooth.
3. Remove Third-Party Accessories
If you have attached any non-standard filters, wide-angle lenses, or other accessories to your drone’s camera, remove them temporarily.
- Excess Weight: Even a slight increase in weight can put extra strain on the gimbal motors. Remove the accessories, then restart your drone and check if the error persists. If the error resolves, the accessory might be too heavy or improperly fitted.
4. Update Drone Firmware
Outdated or corrupted firmware can lead to various operational issues, including gimbal errors.
- Check for Updates: Connect your drone to its flight application and check for any available firmware updates.
- Install Carefully: If an update is available, follow the on-screen instructions precisely. Ensure your drone and remote controller are fully charged before starting the update to prevent power interruptions.
- Post-Update Checks: After the firmware update, it’s a good practice to perform another gimbal calibration.
5. Reset Drone to Factory Settings
If all other software-related troubleshooting steps fail, a factory reset can sometimes clear persistent issues by reverting the drone’s software to its original state.
- Backup Data: Before proceeding, ensure you back up any important flight logs, settings, or cached data, as a factory reset will erase them.
- Perform Reset: In your drone’s flight application settings, look for an option like “Reset to Factory Settings.” Confirm your decision and allow the drone to complete the process.
- Recalibrate and Test: After the reset, you will likely need to re-link your remote controller, calibrate the gimbal, and potentially perform other initial setup steps.
6. Adapt Your Flying Style in Sport Mode
If the gimbal overload error specifically occurs when flying aggressively in Sport mode, consider adjusting your control inputs.
- Gentle Movements: Try to use smoother, less abrupt movements with your control sticks. Sometimes, rapid changes in direction or speed can temporarily push the gimbal’s limits, especially if it’s already under slight strain from other factors. A gentle nudge of the stick might resolve the temporary warning.
Preventing Gimbal Overload Issues
Proactive maintenance and mindful operation can significantly reduce the chances of encountering a gimbal overload error.
- Regular Inspections: Make a habit of performing a quick visual inspection of your gimbal before every flight. Look for debris, loose parts, and ensure the gimbal moves freely.
- Proper Storage and Transport: Always use a dedicated drone case with custom-fitted foam to protect your drone and its sensitive gimbal during transport. Ensure the gimbal protector is in place when storing or moving the drone.
- Cleanliness is Key: Keep your drone, especially the gimbal area, clean. After flying in dusty or sandy environments, gently clean the gimbal with a soft brush or air blower.
- Smooth Take-off and Landing: Always take off and land on a flat, clean surface. Consider using a portable landing pad, especially when operating in challenging terrain, to protect the gimbal from dirt and impacts.
- Stay Updated: Regularly check for and install firmware updates for both your drone and remote controller. Manufacturers often release updates that improve stability and fix known bugs.
- Mindful Flying: While drones are robust, avoiding aggressive maneuvers, especially during high winds or in challenging conditions, can reduce stress on the gimbal motors.
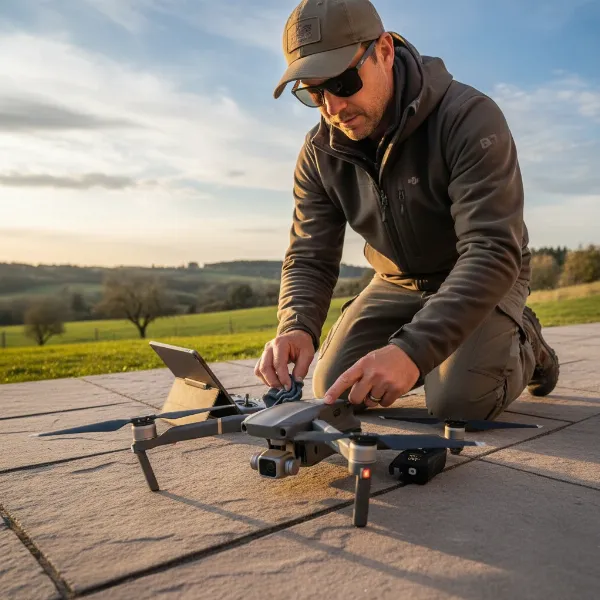 A drone pilot performing a pre-flight check on their drone, inspecting the propellers, battery, and especially the gimbal for any issues, on a flat surface outdoors, emphasizing safety and preparedness.
When to Seek Professional Help
If you’ve diligently followed all the troubleshooting steps and the “Gimbal Overload” error persists, or if you notice visible damage to the gimbal assembly, it’s likely a hardware issue that requires professional attention.
- Persistent Errors: When calibration, cleaning, firmware updates, and resets don’t resolve the problem, the issue is often mechanical.
- Visible Damage: If you see bent gimbal arms, cracked housing, or hear unusual grinding noises, do not attempt to force movement or fly the drone.
- Contact Manufacturer Support: Reach out to your drone’s manufacturer (e.g., DJI Support) or a certified repair center. They have the specialized tools and expertise to diagnose and repair internal hardware faults, such as worn-out motors or faulty sensors. Attempting complex repairs yourself without proper training can void your warranty or cause further damage.
“A drone’s gimbal is its eyes to the sky. Treating it with care, understanding its limits, and knowing when to troubleshoot or seek professional help ensures you continue capturing stunning aerial narratives.” – DroneEar.com Admin, Senior Drone Technician
Conclusion
The “Gimbal Overload” error, while frustrating, is a common issue with a range of possible solutions. By systematically troubleshooting, starting with simple physical inspections and calibration, and progressing to software updates and resets, you can often restore your drone’s camera to perfect working order. Remember that proper care, regular maintenance, and mindful flying are your best defenses against future gimbal problems. Don’t let a technical glitch deter you from the incredible world of aerial photography and videography. What spectacular views will your perfectly functioning drone gimbal help you capture next?
Frequently Asked Questions
What does “Gimbal Motor Overload” mean on my DJI drone?
“Gimbal Motor Overload” on a DJI drone indicates that the gimbal’s motors are experiencing excessive resistance, preventing them from stabilizing the camera properly. This can be caused by physical obstructions like debris, a stuck gimbal guard, or internal hardware issues, leading to shaky footage or an inability to move the camera.
How do I calibrate my drone’s gimbal?
To calibrate your drone’s gimbal, place the drone on a perfectly flat and level surface. Open your drone’s flight app, navigate to the settings (often under “Control” or “Gimbal”), and select “Gimbal Calibration.” Choose “Auto Calibration” and follow any on-screen prompts, keeping the drone still until the process is successfully completed.
Can a gimbal overload error be caused by a software bug?
Yes, a gimbal overload error can sometimes be triggered by software issues, such as corrupted firmware or calibration errors. Ensuring your drone’s firmware is up-to-date and performing a gimbal calibration through the flight app are crucial steps to rule out software-related problems.
Should I remove third-party filters if I get a gimbal overload error?
Yes, you should definitely remove any third-party filters or wide-angle lenses if you encounter a gimbal overload error. These accessories can add extra weight that overstrains the gimbal motors, especially if they were not designed specifically for your drone model or if the drone is already struggling with minor resistance.
When is it time to send my drone in for professional gimbal repair?
It’s time for professional repair if the gimbal overload error persists after you’ve tried all basic troubleshooting steps like cleaning, calibration, firmware updates, and removing accessories. Visible physical damage, unusual noises from the gimbal, or a complete lack of movement are also strong indicators that the issue is mechanical and requires expert diagnosis and repair.