Are you ready to transform your aerial shots into mesmerizing works of art, capturing the elusive dance of time from a bird’s-eye view? Drone long exposure photography is a powerful technique that can elevate your aerial imagery, creating smooth, dreamy effects often associated with traditional landscape photography. With the right equipment, settings, and a touch of patience, you can unlock a new realm of creative possibilities with your drone.
Understanding Long Exposure Photography with a Drone
Long exposure photography involves keeping your camera’s shutter open for an extended duration, allowing more light to reach the sensor. This technique artistically blurs any moving elements within the frame while keeping stationary objects sharp. The result is often a serene, almost painterly quality in your photographs, depicting movement in a way a single, fast shot cannot. From blurring rushing waterfalls into silky cascades to transforming urban traffic into dynamic light trails, long exposure adds a unique, ethereal dimension to your visual storytelling.
Drones bring an unparalleled perspective to this classic photographic method. Unlike ground-based cameras limited by elevation, a drone acts as a “flying tripod,” offering elevated viewpoints that were once only accessible by manned aircraft. This aerial advantage allows you to capture sweeping landscapes, vast bodies of water, and cityscapes with an artistic blur of motion, all from a unique vantage point high above the ground.
Essential Gear for Drone Long Exposure
To successfully venture into drone long exposure photography, specific equipment is indispensable, particularly Neutral Density (ND) filters.
The Crucial Role of ND Filters
|
Our Picks for the Best Drone in 2026
As an Amazon Associate I earn from qualifying purchases.
|
||
| Num | Product | Action |
|---|---|---|
| 1 | Drone with Camera, Drones for Adults and Beginners, 1080P HD FPV Foldable Mini Drones for Kids, with 2 Batteries, Carrying Case, Trajectory Flight, Gravity Control, One-Key Takeoff/Landing, 360° Flip, Toys for Gift |

|
| 2 | Drone with Camera for Adults 4K, Brushless Motor Drones for Kids Beginners, 60 Mins Flight, 130° Lens, FPV Foldable RC Quadcopter, Gesture Photography, Toys Gifts for Teen Boys Girls, Black |
|
| 3 | GPS Drones with Camera for Adults 4K, FPV Drone Under 249g with Brushless Motor, GPS Auto Return, Follow Me, Circle Fly, Waypoint Flight, Foldable Drone with Gesture Control, 46Mins with 2 Batteries |
|
| 4 | Drone with Camera 1080P HD FPV Foldable Mini Drone for Beginners Kids Adults, Drone with One Key Take Off/Landing, Gesture Selfie, Altitude Hold, 3D Flip, Easy to Fly, 2 Batteries, Toys for Boys Girls |
|
| 5 | DJI Mini 3 Fly More Combo (DJI RC), Drones with Camera for Adults 4K, 3 Batteries for 114-min Flight Time, Vertical Shooting, 32800ft (10km) Video Transmission, Lightweight Mini Drone for Beginners |
|
| 6 | DJI Mini 4K, Drone with 4K UHD Camera for Adults, Under 249 g, 3-Axis Gimbal Stabilization, 10km Video Transmission, Auto Return, Wind Resistance, 1 Battery for 31-Min Max Flight Time, Intelligent |
|
| 7 | Drone with 1080P Camera - Foldable Remote Control Quadcopter with Gesture Control, 3D Flip, One Key Start, Emergency Stop, 2 Batteries, Easier to use, Toy for Kids Adult Beginners |
|
| 8 | Drone with Camera - Drone with Screen on Controller for Beginners, Foldable Remote Control Quadcopter with Gesture Control, 3D Flip, One Key Start, Emergency Stop, 2 Batteries, Easier to use to use |
|
| 9 | DJI Air 3S Fly More Combo (RC 2 Screen Remote Controller), Drone with 1" CMOS Wide-Angle & Medium Tele Camera for Adults, 4K/60fps, Omnidirectional Sensing & 3 Batteries for Extended Flight Time |
|
| 10 | DJI Mini 4K Camera Drone Combo, Drone with 4K UHD Camera for Adults, Under 249 g, 3-Axis Gimbal Stabilization, 10km Video Transmission, Auto Return, 2 Batteries for 62-Min Max Flight Time, QuickShots |
|
Think of ND filters as sunglasses for your drone’s camera. They are designed to reduce the amount of light entering the lens without altering the color balance. This light reduction is critical because it allows you to use slower shutter speeds, even in bright conditions, preventing your image from becoming overexposed and washed out. Without ND filters, attempting long exposures during daylight would simply result in a completely white, unusable image.
Choosing the Right ND Filter Strength
ND filters come in various strengths, each designed to block a different amount of light. The strength is indicated by a number (e.g., ND4, ND16, ND64, ND1000), representing how many stops of light are reduced.
- ND4: Ideal for low light, overcast days, or early golden hour when only a slight reduction in light is needed.
- ND8 – ND16: Suitable for standard daylight conditions, offering a good balance for typical long exposure effects. ND16 reduces light by 4 stops.
- ND32 – ND64+: Necessary for very bright conditions, such as midday sun or scenes involving snow or beaches, which reflect a lot of light. ND64 will reduce light by 6 stops.
- ND1000 – ND2000: These “super” ND filters provide extreme light reduction (10 to 11 stops), enabling very long exposures even in the middle of a bright day.
It’s vital to ensure that the ND filters you purchase are compatible with your specific drone model, as different drones have varying filter mounts. Many drone manufacturers, especially DJI, offer their own filter kits, and reputable third-party brands also provide high-quality options.
Drones with Adjustable Aperture (and why it matters)
While many consumer drones have a fixed aperture, some high-end models like the DJI Mavic 3, Mavic 2 Pro, Phantom 4 Pro, and Inspire 2 offer an adjustable diaphragm. This feature provides additional flexibility in controlling exposure. A smaller aperture (higher f-number, e.g., f/11) reduces the amount of light, further allowing for longer shutter speeds even without the strongest ND filters, especially around sunrise or sunset. Setting the aperture between f/5.6 and f/8 often yields the sharpest results on drones with this capability.
Mastering Drone Camera Settings
Achieving stunning long exposure drone photos requires moving beyond automatic modes and taking full control of your drone’s camera settings.
Switching to Manual Mode
The first and most crucial step is to switch your drone’s camera into Manual or Pro Mode. This unlocks full control over key exposure parameters like ISO, shutter speed, and white balance, giving you the precision needed for creative long exposure shots.
ISO: Keeping it Low for Clarity
For long exposure photography, your primary goal for ISO should be to keep it as low as possible, typically ISO 100 or 200. A low ISO minimizes digital noise and grain, ensuring the cleanest possible image, which is especially important for preserving detail in blurred areas and subtle transitions. Increasing the ISO would introduce more light, counteracting the purpose of slow shutter speeds and ND filters.
Shutter Speed: The Key to Motion Blur
The shutter speed is the cornerstone of long exposure, determining how much motion blur you capture. The ideal shutter speed will depend on the ambient light, the strength of your ND filter, and the desired effect.
- Water motion blur: Experiment with shutter speeds between 1 to 5 seconds for silky smooth water in waterfalls, rivers, or ocean waves.
- Soft cloud movement: For dreamy cloud trails, try longer shutter speeds, often in the range of 5 to 8 seconds, if your drone supports it.
- Light trails: At dusk or night, shutter speeds of 5 to 8 seconds are often perfect for dragging vehicle lights or boat trails.
Remember to experiment; there’s no single “perfect” shutter speed, as lighting conditions and the speed of movement vary. Continuously adjust until you achieve the artistic effect you envision.
Aperture Control (if available)
If your drone features an adjustable aperture, set it between f/5.6 and f/8 for optimal sharpness. A wider aperture (smaller f-number) lets in more light, while a narrower aperture (larger f-number like f/11) restricts light, helping you achieve longer shutter speeds. This can be particularly useful when combined with ND filters.
White Balance and Focus Settings
- White Balance: Set your white balance manually to match the lighting conditions (e.g., “Daylight,” “Cloudy,” or a specific Kelvin temperature). This ensures consistent color and prevents your drone from automatically adjusting it mid-shot.
- Focus: Always ensure your camera is precisely focused on your stationary subject to guarantee crisp details where desired. Autofocus can sometimes be unreliable in low light or with ND filters; consider using manual focus if available.
Shooting in RAW for Post-Processing Flexibility
Always shoot your long exposure photos in RAW + JPEG mode. RAW files capture the maximum amount of image data directly from the sensor, providing far greater flexibility during post-processing. This allows you to recover details in highlights and shadows, fine-tune colors, and reduce noise much more effectively than with compressed JPEG files.
Optimal Conditions for Success
Even with the right gear and settings, successful drone long exposure photography hinges on choosing the right conditions.
Weather Wisdom: The Impact of Wind
Stability is paramount for sharp long exposure images. Therefore, minimal wind is absolutely essential. Even slight gusts can cause your drone to drift or vibrate, resulting in unwanted blur in your final photograph. Aim for calm, still conditions to ensure your drone can maintain a rock-steady hover.
Lighting for Long Exposure: Golden Hour, Blue Hour, and Beyond
The best times for drone long exposure photography are often around the edges of the day when natural light is softer and more manageable.
- Golden Hour: The hour after sunrise and before sunset offers warm, soft light that can be beautiful for long exposures.
- Blue Hour: The period just before sunrise or just after sunset provides a deep blue ambient light, perfect for capturing cityscapes and light trails with a cool, dramatic tone.
- Overcast or Cloudy Days: These conditions offer diffused, even lighting, which is ideal for long exposures as it reduces harsh shadows and highlights.
- Night: Long exposures at night are fantastic for capturing light trails from vehicles, boats, or illuminated buildings.
While it’s possible to do long exposures in bright midday sun with very strong ND filters (ND1000+), the results can sometimes lack the dynamic range and atmospheric quality of shots taken in softer light.
Flight Modes for Stability (Tripod/Cine Mode)
Many modern drones, particularly DJI models, include flight modes designed for enhanced stability. Tripod Mode (or Cine Mode) significantly reduces the drone’s joystick sensitivity and flight speed, allowing for extremely precise movements and a much steadier hover. Activating this mode is highly recommended to minimize micro-movements that could lead to blurry long exposure shots.
Pre-Flight Checks and Stable Hovering
Before capturing your masterpiece, always perform thorough pre-flight checks, including battery levels, propeller integrity, and clear airspace. Once airborne, position your drone for the desired composition and let it hover steadily for a few seconds before pressing the shutter button. This allows the drone and its gimbal to fully stabilize, ensuring the sharpest possible stationary elements in your image. Equally important, wait until the exposure is complete before moving your drone again.
Creative Ideas for Drone Long Exposure
The unique aerial perspective of a drone opens up a world of creative possibilities for long exposure photography.
Silky Water Effects (Waterfalls, Lakes, Oceans)
One of the most classic and striking applications of long exposure is transforming moving water into a smooth, ethereal texture. From the powerful rush of a waterfall to the gentle lapping of ocean waves on a beach, a shutter speed of 1-5 seconds can create a stunning “milky” or “misty” effect, making the water appear soft and painterly while the surrounding landscape remains sharp.
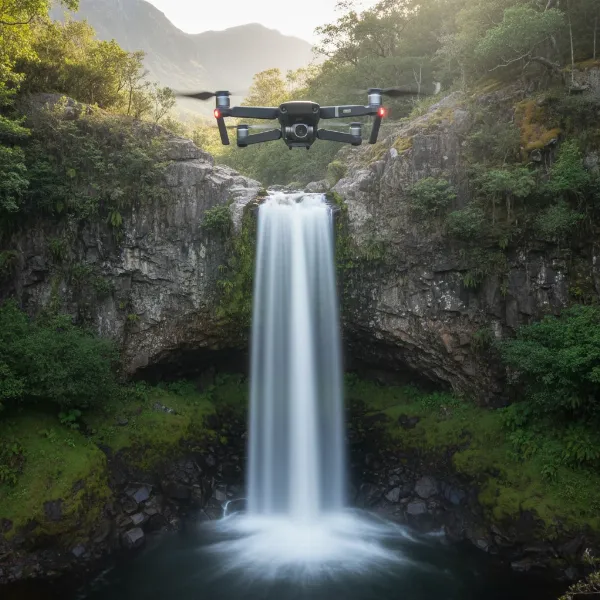 Drone capturing a silky smooth long exposure of a waterfall in a lush green landscape
Capturing Cloud Movement
Clouds drifting across the sky can add incredible drama and depth to your aerial landscapes. With longer shutter speeds (5-8 seconds or more), you can transform distinct clouds into soft, streaky patterns that convey motion and the passage of time. This effect works particularly well over mountains, cityscapes, or vast open fields, drawing the viewer’s eye through the frame.
Dynamic Light Trails (Cityscapes, Highways, Boats)
At dusk or night, drone long exposure truly shines when capturing light trails. Position your drone over a busy highway, a bustling city intersection, or a waterway with active boat traffic, and use a shutter speed of 5-8 seconds to render the moving lights as vibrant, abstract streaks of color against the static backdrop of the environment. This technique creates an energetic and captivating urban landscape.
Unique Perspectives with Drone Movement
While a stable hover is generally preferred for long exposure, experienced pilots can experiment with slight drone movement during a short long exposure (1-2 seconds) to create unique, intentional blurring effects. For instance, a slow forward or backward movement can produce a distinct motion blur that emphasizes speed or a sense of journey, especially when flying closer to the ground. Descending or ascending while taking a top-down shot can also yield unexpected and artistic results.
Overcoming Challenges and Advanced Techniques
Even with the best preparation, drone long exposure photography can present unique challenges.
Dealing with Drone Movement and Vibrations
Unlike a ground-based tripod, a drone is constantly fighting environmental factors like wind. While modern drones are remarkably stable, they are not perfectly still. Very long shutter speeds (e.g., beyond 2 seconds for stills) can introduce unwanted blur from subtle drone drift, even in calm conditions.
To mitigate this, shoot multiple exposures (at least two to three of the same scene) without moving your drone. This gives you options in case one shot is slightly blurred. You can also stack these multiple shots in post-processing software to simulate an even longer exposure and reduce noise, effectively creating a composite image with the desired blur.
Night Photography Considerations (Stars vs. Light Trails)
When shooting at night, consider your subject carefully. If your goal is to capture crisp individual stars, very long exposures (e.g., 30 seconds) are usually counterproductive, as the Earth’s rotation will cause stars to appear as streaks. In such cases, a higher ISO with a shorter shutter speed (to freeze the stars) is often preferred, though this can introduce more noise. For capturing city lights or light trails, longer exposures are ideal and the slight movement of stars won’t be an issue.
Post-Processing Tips: Stacking and Enhancing
Post-processing is an integral part of long exposure photography. Shooting in RAW gives you the best foundation. Software like Adobe Lightroom or Photoshop allows you to:
- Adjust Exposure and Contrast: Fine-tune the overall brightness and dynamic range.
- Reduce Noise: Essential, especially for night shots or images taken with slightly higher ISOs.
- Enhance Colors: Bring out the vibrancy of light trails or the mood of a twilight sky.
- Image Stacking: Blend multiple long exposure shots to reduce noise and achieve an even smoother motion blur effect, or to create a composite with perfectly sharp stationary elements and blurred motion.
Choosing the Right Drone for Long Exposure
While most modern drones with manual camera controls can attempt long exposure, some features make the process easier and the results more stunning.
Key Camera Specifications to Look For
When considering a drone for long exposure photography, prioritize models with:
- Manual Camera Controls: Full control over ISO, shutter speed, and white balance.
- RAW Image Capture: Crucial for post-processing flexibility.
- Adjustable Aperture: Offers greater control over light intake (e.g., f/2.8 to f/11).
- Strong Gimbal Stabilization: A robust 3-axis gimbal is essential for maintaining a stable camera during long exposures.
- Reliable Hovering Capabilities: Drones with advanced GPS and vision positioning systems will hold their position more accurately.
- ND Filter Compatibility: Ensure there are quality ND filter sets available for the specific drone model.
Popular Drone Models for Aerial Long Exposure
Many DJI drones are excellent choices due to their advanced camera systems and stable flight. Models frequently mentioned for their long exposure capabilities include:
- DJI Mavic Series (Mavic 3, Mavic 2 Pro): Known for excellent camera quality and often featuring adjustable apertures.
- DJI Air Series (Air 3, Air 3S): Offer great cameras and stability, with the Air 3S noted for its long exposure prowess.
- DJI Phantom Series (Phantom 4 Pro): A classic choice with a large sensor and adjustable aperture.
- DJI Mini Series (Mini 4 Pro): While smaller drones like the Mini series may have limitations on ultra-long shutter speeds (e.g., 8s+ might not be available), they can still produce impressive results with proper ND filters and settings.
Tips for Safe and Ethical Drone Photography
Always prioritize safety and adhere to local regulations when flying your drone. Maintain visual line of sight, avoid flying near airports or restricted airspace, and be mindful of privacy. Responsible drone operation ensures that this incredible art form can be enjoyed by everyone.
Conclusion
Drone long exposure photography is a captivating discipline that allows you to transform ordinary aerial scenes into extraordinary visual poetry. By understanding the interplay of ND filters, manual camera settings, and optimal environmental conditions, you can capture the dynamic beauty of moving water, the elegant flow of clouds, and the vibrant trails of urban lights. This technique pushes the boundaries of traditional drone photography, inviting you to slow down and appreciate the world in a whole new light.
Ready to see your aerial photography soar to new artistic heights? Embrace the challenge, experiment with your drone’s capabilities, and capture the mesmerizing dance of time from the sky.
Frequently Asked Questions
What shutter speed is best for drone long exposure?
The best shutter speed varies significantly based on lighting conditions, ND filter strength, and the desired effect. For silky water, try 1-5 seconds. For cloud movement or light trails, 5-8 seconds is often effective. Always start with a baseline and adjust as needed, observing the results on your screen.
Do I always need ND filters for drone long exposure?
Yes, for long exposure photography during daylight hours, ND filters are essential. They reduce the amount of light entering the camera, allowing you to use slower shutter speeds without overexposing your image. Without them, your photos would be completely white in bright conditions.
Can I do long exposure photography with any drone?
While many drones offer manual camera controls, those with excellent gimbal stabilization, RAW image capture, and compatibility with a wide range of ND filters (and ideally adjustable aperture) will yield the best results. Smaller drones might have limitations on the maximum shutter speed available.
How do I prevent blurry drone long exposure photos?
To prevent blur, ensure minimal wind conditions, use your drone’s Tripod or Cine Mode for stability, allow the drone to settle for a few seconds before shooting, and use ND filters to avoid excessively long shutter speeds that might amplify minor drone movements. Shooting multiple images and stacking them can also help.