Maintaining your drone’s propellers is as crucial as keeping its battery charged. Over time, these vital components can endure wear and tear, impacting everything from flight stability to safety. Neglecting damaged propellers can lead to erratic flight, reduced battery life, and even catastrophic crashes. If you’ve noticed a change in your drone’s performance or visible damage to its blades, it’s time to learn how to correctly replace drone propellers. This comprehensive guide will walk you through every step, ensuring your drone returns to the skies safely and performs at its best.
Understanding the proper procedure for propeller replacement is essential for all drone enthusiasts, whether you’re a seasoned pilot or just starting. A small crack or bend can significantly affect aerodynamic efficiency, leading to increased power consumption and strain on your drone’s motors. Taking the time to inspect and replace your propellers correctly will not only extend the lifespan of your drone but also enhance your flying experience with smoother, more stable flights.
Why Replace Drone Propellers? Understanding the Importance
Why is it so important to replace drone propellers promptly? Propellers are the primary components responsible for generating lift and controlling your drone’s movement. Even minor damage can have significant consequences.
Damaged propellers pose a serious safety risk. A crack or chip can weaken the blade, causing it to shatter mid-flight and leading to a sudden loss of control. Furthermore, compromised propellers can cause instability, making the drone harder to maneuver and increasing the likelihood of collisions. Beyond safety, worn or damaged propellers degrade performance. They can cause increased vibrations, which not only result in shaky footage but also put extra stress on the drone’s motors and electronics. This added strain can reduce flight time, diminish battery efficiency, and shorten the overall lifespan of your drone. Regularly inspecting your drone’s propellers and replacing them at the first sign of damage ensures optimal flight performance and safety.
Types of Drone Propellers and Compatibility
Before replacing your drone’s propellers, it’s essential to understand the different types available and ensure you choose ones that are compatible with your specific drone model. Propellers come in various designs, materials, and sizes, each affecting flight characteristics differently.
Propellers can be broadly categorized by their mounting mechanism, number of blades, and material. Common mounting types include standard screw-on, self-tightening, and quick-release designs. Standard propellers require a screwdriver to attach, while self-tightening props twist on and off easily, often featuring marked rotation directions. Quick-release propellers typically snap into place without tools, offering convenience for frequent changes. The number of blades also varies: two-blade propellers are efficient for long-range flight, while three-blade props offer a good balance of thrust and agility, often preferred for FPV racing. Four-blade or multi-blade propellers provide maximum thrust and stability but are less efficient. Propeller materials typically include plastic (affordable, flexible, but less durable) and carbon fiber (more rigid, efficient, and durable, but also more expensive and brittle). Always ensure your new propellers match your drone’s motor in terms of size (diameter and pitch), mounting style, and correct rotation direction (clockwise/CW or counter-clockwise/CCW) to guarantee proper function and avoid flight issues.
Essential Tools and Materials for Propeller Replacement
Having the right tools and materials on hand makes the propeller replacement process smooth and straightforward. Most drone manufacturers include basic tools with their drones or replacement propeller kits, but it’s good to be prepared.
At a minimum, you will need a precision screwdriver, typically a small Phillips head, to remove and install screws that secure the propellers. Some drones might require specific propeller wrenches or other specialized tools, so always consult your drone’s user manual. Crucially, you’ll need a new set of correct replacement propellers for your drone model. Ensure these are genuine or high-quality aftermarket propellers compatible with your drone’s make and model. Many replacement propeller kits also include new screws, which are highly recommended to use as they often come with a pre-applied thread locker for added security. It’s also wise to have a clean, well-lit workspace to prevent losing small parts and ensure clear visibility during the process.
Step-by-Step Guide to Replacing Drone Propellers
Replacing drone propellers correctly is a meticulous process that, when followed carefully, ensures safe and stable flight. Always prioritize safety by first powering off your drone and removing the battery before you begin any maintenance.
1. Power Off and Remove Battery: This is a critical safety step to prevent accidental motor activation.
2. Identify Propeller Rotation: Drones use both clockwise (CW) and counter-clockwise (CCW) propellers. Manufacturers often mark these with labels (e.g., L/R, A/B, or small dots/ridges) or indicate the rotation direction on the motor arms. Note which propeller type corresponds to each motor before removal. Incorrect propeller placement is a common cause of instability or inability to take off.
3. Remove Old Propellers:
- For screw-on propellers, use the appropriate screwdriver (often a small Phillips head) to gently loosen and remove the screws holding the propeller to the motor. It is good practice to hold the motor with your thumb and index finger to prevent it from turning while unscrewing.
- For quick-release or self-tightening propellers, follow the manufacturer’s instructions, which typically involve a push-and-twist or simple unlatching motion.
- Once the screws or locking mechanisms are disengaged, carefully pull the old propeller straight up from the motor shaft. Discard damaged propellers and their old screws, as reusing old screws can lead to loosening during flight.
4. Install New Propellers: - Ensure you have the correct new propeller (CW or CCW) for the specific motor you are working on.
- Align the new propeller with the motor shaft, making sure it sits flush. For screw-on types, align the screw holes.
- Insert the new screws (if provided in your kit) and gently tighten them. Avoid overtightening, which can strip the screw threads or damage the propeller and motor, but ensure they are snug to prevent loosening during flight.
- For self-tightening propellers, twist them in the designated direction (usually indicated on the propeller hub or motor) until they are secure.
5. Double-Check Installation: After installing all new propellers, manually rotate each propeller to ensure it spins freely without any wobbling or obstruction. Gently tug on each propeller to confirm it is firmly attached and does not pull away from the motor. A quick pre-flight check after replacement is always recommended to verify everything is secure.
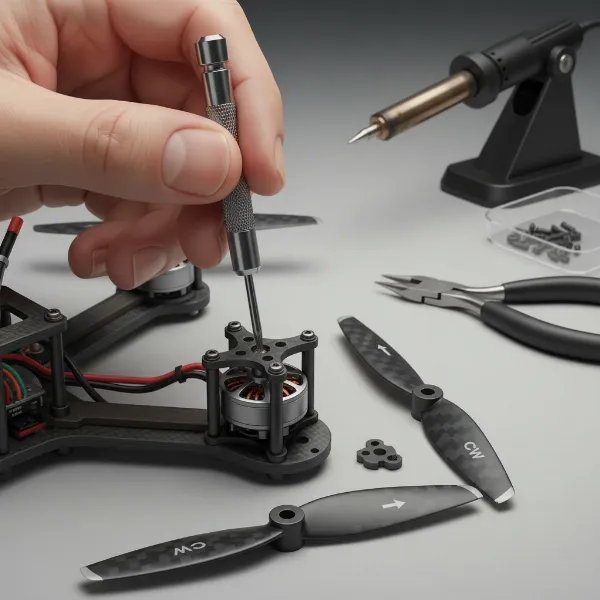 Detailed illustration of a drone propeller being replaced on a motor, showing tools and correct orientation
Common Mistakes to Avoid During Propeller Replacement
Even experienced drone pilots can make simple mistakes during propeller replacement that can compromise flight safety and performance. Being aware of these common pitfalls can save you from frustration and potential crashes.
One of the most frequent errors is installing propellers with the incorrect rotation direction (CW/CCW). Each motor requires a specific propeller type to generate the correct lift and thrust. If installed incorrectly, your drone will likely flip immediately upon takeoff or struggle to maintain stability. Always refer to your drone’s manual and the markings on the propellers and motors. Another common mistake is overtightening or undertightening screws. Overtightening can strip screw threads or crack the propeller hub, while undertightening can cause the propeller to loosen or detach mid-flight. Aim for a snug fit. Using damaged or incompatible propellers is also a significant risk; never try to “fix” a bent or chipped propeller, and always ensure replacement props are specifically designed for your drone model. Lastly, failing to clean debris from the motor shaft before installation can prevent the new propeller from seating properly, leading to vibrations and unstable flight.
Tips for Propeller Maintenance and Longevity
Beyond proper replacement, regular maintenance is key to extending the life of your drone’s propellers and ensuring consistent performance. Simple habits can make a big difference.
Regularly inspect your propellers before and after every flight. Look for any cracks, chips, bends, or discoloration. Even minor damage can escalate into a major problem. If you notice any imperfections, replace the propeller. Clean your propellers periodically with a soft cloth to remove dust, dirt, and debris that can accumulate and affect aerodynamic efficiency. Proper storage is also crucial; store your drone and spare propellers in a protective case to prevent accidental damage during transport or when not in use. Avoid exposing them to extreme temperatures or direct sunlight for extended periods, as this can degrade certain materials. Finally, adopt gentle flying habits to minimize crashes and hard landings, which are primary causes of propeller damage. By being mindful of your flying environment and skill level, you can significantly reduce the frequency of propeller replacements.
When to Seek Professional Help
While many propeller replacements are straightforward, there are instances when seeking professional assistance is the safest and most effective course of action. Knowing when to call in an expert can prevent further damage to your drone.
If your drone model features complex propeller mechanisms, integrated sensors within the propeller assembly, or requires specialized calibration after replacement, it’s best to consult a professional. Additionally, if you suspect any damage to the drone’s motors, such as unusual noises, excessive heat, or visible deformities, a professional can diagnose and repair the issue correctly. Should you encounter persistent flight instability or errors even after correctly replacing propellers, it might indicate a deeper problem with the flight controller or other internal components, warranting expert inspection. Don’t hesitate to reach out to authorized service centers or experienced drone technicians if you are unsure about any part of the repair process or if the problem extends beyond simple propeller replacement.
Conclusion
Replacing drone propellers correctly is a fundamental skill for any drone pilot, crucial for maintaining optimal flight performance and ensuring safety. By understanding the different types of propellers, having the right tools, and meticulously following the step-by-step installation process, you can confidently keep your drone in excellent flying condition. Always remember to inspect your propellers regularly, avoid common replacement mistakes, and practice good maintenance habits to extend their lifespan. Prioritizing correct drone propeller replacement and care allows you to enjoy countless hours of stable, high-quality aerial adventures.
What’s the most unusual drone propeller design you’ve ever seen, and how do you think it affected the drone’s flight?
Frequently Asked Questions
How do I know if my drone propellers are installed correctly?
|
Our Picks for the Best Drone in 2026
As an Amazon Associate I earn from qualifying purchases.
|
||
| Num | Product | Action |
|---|---|---|
| 1 | DJI Mini 4K, Drone with 4K UHD Camera for Adults, Under 249 g, 3-Axis Gimbal Stabilization, 10km Video Transmission, Auto Return, Wind Resistance, 1 Battery for 31-Min Max Flight Time, Intelligent |

|
| 2 | DJI Mini 3 Fly More Combo (DJI RC), Drones with Camera for Adults 4K, 3 Batteries for 114-min Flight Time, Vertical Shooting, 32800ft (10km) Video Transmission, Lightweight Mini Drone for Beginners |
|
| 3 | Drone with Camera for Adults 4K, Brushless Motor Drones for Kids Beginners, 60 Mins Flight, 130° Lens, FPV Foldable RC Quadcopter, Gesture Photography, Toys Gifts for Teen Boys Girls, Black |
|
| 4 | DJI Mini 4K Camera Drone Combo, Drone with 4K UHD Camera for Adults, Under 249 g, 3-Axis Gimbal Stabilization, 10km Video Transmission, Auto Return, 2 Batteries for 62-Min Max Flight Time, QuickShots |
|
| 5 | Drone with Camera, Drones for Adults and Beginners, 1080P HD FPV Foldable Mini Drones for Kids, with 2 Batteries, Carrying Case, Trajectory Flight, Gravity Control, One-Key Takeoff/Landing, 360° Flip, Toys for Gift |
|
| 6 | DJI Air 3S Fly More Combo (RC 2 Screen Remote Controller), Drone with 1" CMOS Wide-Angle & Medium Tele Camera for Adults, 4K/60fps, Omnidirectional Sensing & 3 Batteries for Extended Flight Time |
|
| 7 | GPS Drones with Camera for Adults 4K, FPV Drone Under 249g with Brushless Motor, GPS Auto Return, Follow Me, Circle Fly, Waypoint Flight, Foldable Drone with Gesture Control, 46Mins with 2 Batteries |
|
| 8 | Drone with 1080P Camera - Foldable Remote Control Quadcopter with Gesture Control, 3D Flip, One Key Start, Emergency Stop, 2 Batteries, Easier to use, Toy for Kids Adult Beginners |
|
| 9 | Drone with Camera 1080P HD FPV Foldable Mini Drone for Beginners Kids Adults, Drone with One Key Take Off/Landing, Gesture Selfie, Altitude Hold, 3D Flip, Easy to Fly, 2 Batteries, Toys for Boys Girls |
|
| 10 | Drone with Camera - Drone with Screen on Controller for Beginners, Foldable Remote Control Quadcopter with Gesture Control, 3D Flip, One Key Start, Emergency Stop, 2 Batteries, Easier to use to use |
|
After installation, gently push and pull each propeller to ensure it’s securely attached. Visually check that the CW/CCW markings match the motor arm instructions and that the propellers are not wobbling. Before flight, a very gentle throttle increase can reveal instability or flipping if props are incorrect.
Can I mix and match different brands of drone propellers?
It is generally not recommended to mix and match different brands or types of propellers on the same drone. Different propellers have varying weights, pitches, and flex characteristics, which can lead to imbalance, increased vibrations, and unpredictable flight behavior, potentially causing damage or crashes. Always use a matched set from the same manufacturer and type.