Have you ever watched breathtaking drone footage and wondered how to achieve those smooth, cinematic shots without years of piloting experience? Many drone enthusiasts find manual flight challenging when aiming for professional-looking video. The good news is, modern drones, especially those from DJI, offer an incredible solution: QuickShots. These intelligent flight modes automate complex maneuvers, allowing you to capture stunning aerial cinematography with just a few taps. This comprehensive guide will walk you through mastering three popular QuickShot modes—Dronie, Helix, and Rocket—to transform your aerial storytelling.
What Are Drone QuickShots? An Overview of Automated Drone Filming
QuickShots are an innovative feature designed into many popular consumer drones, including models from the DJI Mavic, Mini, Air, and Spark series. Essentially, they are pre-programmed flight paths combined with automated camera movements that allow your drone to perform sophisticated aerial maneuvers on its own. This eliminates the need for advanced manual piloting skills, making cinematic drone videography accessible to everyone. QuickShots capture short, engaging video clips perfect for social media or more extensive video projects. They represent a significant leap in drone technology, simplifying the process of getting those “impossible” shots.
The Evolution of Drone Filming: From Manual to Automatic
|
Our Picks for the Best Drone in 2026
As an Amazon Associate I earn from qualifying purchases.
|
||
| Num | Product | Action |
|---|---|---|
| 1 | GPS Drones with Camera for Adults 4K, FPV Drone Under 249g with Brushless Motor, GPS Auto Return, Follow Me, Circle Fly, Waypoint Flight, Foldable Drone with Gesture Control, 46Mins with 2 Batteries |

|
| 2 | DJI Mini 3 Fly More Combo (DJI RC), Drones with Camera for Adults 4K, 3 Batteries for 114-min Flight Time, Vertical Shooting, 32800ft (10km) Video Transmission, Lightweight Mini Drone for Beginners |
|
| 3 | DJI Mini 4K, Drone with 4K UHD Camera for Adults, Under 249 g, 3-Axis Gimbal Stabilization, 10km Video Transmission, Auto Return, Wind Resistance, 1 Battery for 31-Min Max Flight Time, Intelligent |
|
| 4 | DJI Air 3S Fly More Combo (RC 2 Screen Remote Controller), Drone with 1" CMOS Wide-Angle & Medium Tele Camera for Adults, 4K/60fps, Omnidirectional Sensing & 3 Batteries for Extended Flight Time |
|
| 5 | Drone with Camera, Drones for Adults and Beginners, 1080P HD FPV Foldable Mini Drones for Kids, with 2 Batteries, Carrying Case, Trajectory Flight, Gravity Control, One-Key Takeoff/Landing, 360° Flip, Toys for Gift |
|
| 6 | Drone with Camera 1080P HD FPV Foldable Mini Drone for Beginners Kids Adults, Drone with One Key Take Off/Landing, Gesture Selfie, Altitude Hold, 3D Flip, Easy to Fly, 2 Batteries, Toys for Boys Girls |
|
| 7 | DJI Mini 4K Camera Drone Combo, Drone with 4K UHD Camera for Adults, Under 249 g, 3-Axis Gimbal Stabilization, 10km Video Transmission, Auto Return, 2 Batteries for 62-Min Max Flight Time, QuickShots |
|
| 8 | Drone with Camera for Adults 4K, Brushless Motor Drones for Kids Beginners, 60 Mins Flight, 130° Lens, FPV Foldable RC Quadcopter, Gesture Photography, Toys Gifts for Teen Boys Girls, Black |
|
| 9 | Drone with Camera - Drone with Screen on Controller for Beginners, Foldable Remote Control Quadcopter with Gesture Control, 3D Flip, One Key Start, Emergency Stop, 2 Batteries, Easier to use to use |
|
| 10 | Drone with 1080P Camera - Foldable Remote Control Quadcopter with Gesture Control, 3D Flip, One Key Start, Emergency Stop, 2 Batteries, Easier to use, Toy for Kids Adult Beginners |
|
The journey of drone technology has seen remarkable progress, transitioning from rudimentary manual controls to highly advanced, intelligent flight systems. Early drones required meticulous manual input for every movement, demanding significant skill and practice to achieve stable and aesthetic footage. The introduction of features like QuickShots marked a pivotal shift, democratizing professional-grade aerial videography. This automation has empowered countless users to explore creative angles and dynamic movements that were once the exclusive domain of expert pilots, pushing the boundaries of what is possible in aerial content creation.
Popular QuickShot Types: A Glimpse into Creative Flight Paths
While the QuickShot suite can vary slightly by drone model, some core modes are universally loved for their unique cinematic effects. Dronie, Helix, and Rocket are among the most frequently used, each offering a distinct visual narrative. Dronie provides an expansive “drone selfie,” Helix delivers a dramatic spiraling reveal, and Rocket offers an exhilarating top-down ascent. Beyond these, other modes like Circle, Boomerang, and Asteroid further expand your creative toolkit, allowing for a diverse range of captivating aerial shots. Understanding the purpose and execution of each can dramatically enhance your drone videography.
Benefits of Harnessing Drone QuickShots
Utilizing QuickShot modes isn’t just about ease; it’s about unlocking a new level of creative potential and efficiency in your drone workflow. These intelligent features provide numerous advantages that can benefit both novice pilots and seasoned professionals.
Achieve Professional-Looking Footage Effortlessly
One of the most compelling benefits of QuickShots is their ability to produce smooth, stable, and visually impressive footage with minimal input. The drone’s algorithms handle the complex flight paths and camera adjustments, ensuring a polished, cinematic result every time. This means you can focus on framing your subject and composing your shot, rather than wrestling with intricate joystick movements. The automated precision often surpasses what even experienced pilots can achieve manually, especially for repetitive or highly dynamic maneuvers.
Simplify Complex Aerial Maneuvers
Imagine trying to manually fly your drone backward and upward while simultaneously keeping a subject perfectly centered and spiraling outward. It’s an incredibly difficult task that QuickShots simplify into a single tap. These modes automate these challenging sequences, allowing you to execute sophisticated movements that would otherwise require extensive practice and coordination. This simplification is invaluable for capturing dynamic footage in diverse environments, from sprawling landscapes to intimate portraits.
Time-Saving for Content Creators
In the fast-paced world of content creation, efficiency is key. QuickShot modes significantly reduce the time spent setting up and executing shots. Instead of multiple takes and meticulous manual adjustments, a QuickShot can capture an entire cinematic sequence in a matter of seconds. This speed allows you to get more shots in different locations or from various angles during a single flight session, maximizing your creative output and streamlining your production process.
Ideal for Social Media and Quick Sharing
The short, dynamic clips generated by QuickShots are perfectly tailored for sharing on social media platforms. Their high-impact visuals and concise nature grab attention immediately, making them highly engaging for audiences on Instagram, TikTok, YouTube Shorts, and other platforms. Many DJI apps even offer automatic editing features for QuickShot footage, adding music and effects to create shareable videos instantly. This makes it easier than ever to showcase your drone’s capabilities and your adventures.
How to Execute QuickShots: A Step-by-Step Guide
Activating QuickShots on your drone is a straightforward process, typically managed through the accompanying flight application on your smartphone or tablet. While the exact interface might vary slightly between drone models and app versions, the fundamental steps remain consistent.
Pre-Flight Checklist: Ensuring a Safe and Successful QuickShot
Before initiating any QuickShot, safety should always be your top priority. Ensure your drone is in an open area, free from obstacles like trees, power lines, buildings, and people. A clear line of sight to your drone is also crucial. Check your battery levels for both the drone and the remote controller, and confirm a strong GPS signal. Launch your drone and hover it steadily at least 2 meters (approximately 6.5 feet) above the ground before proceeding. Always be aware of local drone regulations and no-fly zones.
Navigating the DJI Fly App (or similar) to QuickShot Mode
Once your drone is airborne and stable, open the DJI Fly app (or the relevant app for your drone). Look for the flight mode selection icon, often represented by a remote control or video camera symbol, usually located on the right side of the screen. Tap this icon, then select “QuickShot” from the menu that appears alongside other flight modes like Photo and Video. This will bring up the various QuickShot options.
Selecting Your Subject and Customizing Parameters
After entering QuickShot mode, you’ll see a selection of available QuickShot types. Choose the specific mode you wish to use (Dronie, Helix, or Rocket). The app will then prompt you to select your subject. You can typically do this by tapping on your subject on the screen or by drawing a box around it. Once highlighted by a green square, the drone’s ActiveTrack system will lock onto it. Depending on the QuickShot, you may also have options to customize parameters such as flight distance, height limit, or direction (e.g., clockwise or counter-clockwise for Helix). It’s often recommended to start with shorter distances if you are new to a specific QuickShot.
Initiating the Shot and Monitoring Flight
With your subject selected and parameters set, tap the “Start” button. The app will usually display a 3-2-1 countdown before the drone begins its automated flight and recording. The drone will automatically start recording, so there’s no need to manually press the record button. During the QuickShot, it’s essential to keep your hands off the control sticks unless you need to cancel the flight due to an emergency or unexpected obstacle. You can cancel any QuickShot mid-flight by tapping the red circle with a cross on the screen or pressing the flight pause button on your controller. After completing the maneuver, the drone will either hover in place or return to its starting position, depending on the specific QuickShot mode.
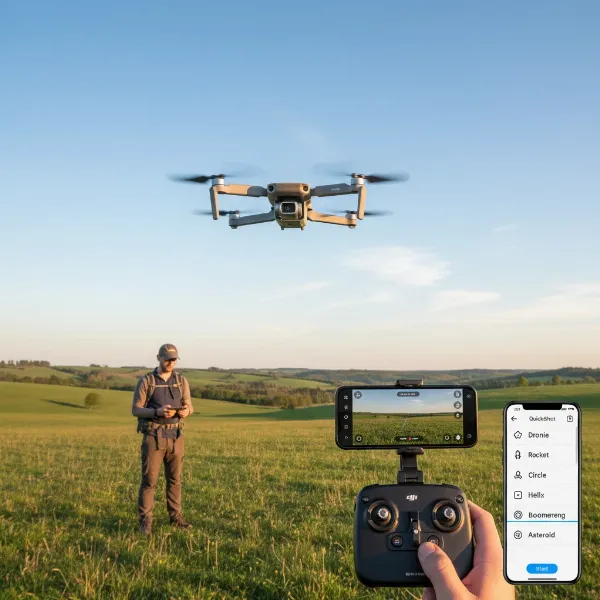 A drone hovering over a field with a person in the foreground, ready to execute a QuickShot.
Mastering Dronie: The Ultimate Drone Selfie
The Dronie QuickShot is one of the most popular and easiest ways to capture an impressive “drone selfie” or a grand reveal of a landscape. It provides a dynamic, expansive shot that starts close to your subject and gracefully pulls back and up.
What is Dronie?
The Dronie mode instructs your drone to fly backward and upward in a straight line, while simultaneously keeping your selected subject perfectly centered and in frame. This creates a compelling effect where the subject appears to shrink as the drone ascends, revealing more of the surrounding environment. It’s akin to a camera operator physically walking away from you while lifting the camera higher, but with drone-like smoothness and perspective.
Best Scenarios for Dronie Shots
Dronie is perfect for solo adventurers, groups, or showcasing a location from a personal perspective. Use it to:
- Capture yourself or friends with a stunning backdrop like mountains, beaches, or cityscapes.
- Reveal a beautiful landscape or architectural marvel after focusing on a specific element.
- Create dynamic opening shots for vlogs or travel videos, establishing your presence within a grand scene.
Tips for Perfecting Your Dronie
- Subject Placement: Ensure your subject is initially well-centered in the frame.
- Background Awareness: Choose a location with an interesting background that will be revealed as the drone flies back and up.
- Height Setting: Experiment with the customizable height limit (e.g., 40, 60, 80, 100, or 120 feet) to control the dramatic effect. A higher setting offers a grander reveal.
- Clear Path: Verify the drone has a clear path backward and upward, free from any obstacles.
Mastering Helix: The Cinematic Spiral Reveal
Helix mode is a favorite for its elegant, spiraling motion that reveals a subject or location with a touch of dramatic flair. It adds a sophisticated dynamic element to your drone footage.
What is Helix?
In Helix mode, your drone performs a graceful ascending spiral flight path. It starts close to your subject, then gradually flies upward and outward, spiraling around the subject while meticulously keeping it framed in the center. This creates a captivating corkscrew effect that showcases both the subject and its expanding environment in a fluid, continuous motion. The initial radius is determined by the drone’s starting distance to the subject.
When to Utilize Helix Shots
Helix is incredibly versatile and shines in situations where you want to emphasize both a central point and its surroundings. Consider using it for:
- Showcasing landmarks or statues: Highlight a monument while revealing its context.
- Capturing individual subjects: Perfect for a person or a small group standing in an open area, creating a dramatic hero shot.
- Introducing a scenic location: Begin focused on a specific feature, then expand to reveal the entire vista.
Pro Tips for Stunning Helix Footage
- Ample Space: Helix requires significant horizontal and vertical space. Ensure a wide-open area with no obstacles in the drone’s spiraling path.
- Subject Centering: Precisely select and center your subject for the drone to track effectively.
- Radius Adjustment: Adjust the maximum flight radius (typically 40-120 feet or meters depending on the drone model) to control how far and wide the spiral expands. A larger radius provides a more epic reveal.
- Direction: Some drones allow you to choose clockwise or counter-clockwise rotation, offering creative flexibility.
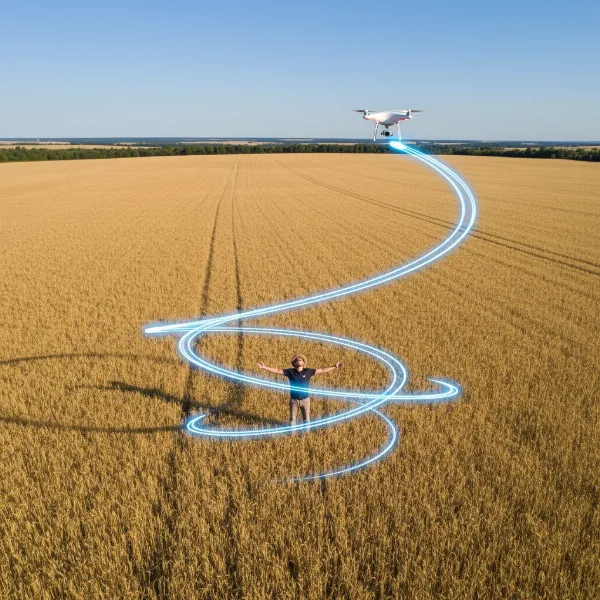 A drone performing a Helix QuickShot around a subject, illustrating the upward spiraling motion.
Mastering Rocket: The Dramatic Overhead Ascent
Rocket mode offers a unique, dramatic perspective by launching your drone straight up into the sky, providing a sweeping top-down view of your subject and its surroundings.
What is Rocket?
The Rocket QuickShot sends your drone vertically upwards at a steady pace. During its ascent, the camera automatically tilts downwards, maintaining a focus on your selected subject directly below. This creates a powerful, cinematic reveal that starts with a close-up overhead view and expands into a wide, bird’s-eye perspective as the drone climbs higher. Once the set height is reached, the drone will typically return to its original position.
Ideal Situations for Rocket Shots
Rocket mode is excellent for grand reveal shots and establishing aerial views. Use it to:
- Highlight impressive architecture: Showcase buildings, stadiums, or historical sites from directly above.
- Capture vast landscapes: Great for revealing expansive forests, coastlines, or open fields.
- Create dynamic transitions: Start with an intimate overhead shot of a subject and transition to a wide establishing shot.
- Emphasize scale: Dramatically illustrate the size of a subject relative to its environment.
Expert Advice for Capturing Impactful Rocket Shots
- Clear Vertical Path: This is critical. Ensure there are absolutely no overhead obstructions (trees, wires, ceilings, etc.) as the drone ascends directly upwards.
- Subject Centering: Position your subject precisely in the center of the frame before initiating the shot. The drone will keep it tracked throughout the vertical climb.
- Height Setting: Set the desired ascent height (e.g., 40-120 feet) to control the duration and grandness of the shot. A higher setting offers a more expansive view.
- Weather Conditions: Perform Rocket shots in calm weather, as strong winds can affect the drone’s stability during a vertical ascent.
- Gimbal Lock (Manual Alternative): “My recommended settings for Rocket mode are to get the drone to go as high as possible, most of the time. This gives you more of a real drone shot up in the sky.” – Justin Bainbridge, Drone Expert. You may also consider turning on “gimbal lock” or “fixed exposure” if available, to prevent exposure changes during the ascent, ensuring consistent video quality.
Advanced Tips for Elevating Your QuickShot Game
While QuickShots are largely automated, a few extra considerations can further enhance your results and ensure optimal safety and quality.
Environmental Awareness and Safety Protocols
Always scout your location thoroughly before flying. Identify potential hazards, consider lighting conditions, and be mindful of privacy. Always maintain a safe distance from people and property. Pay attention to wind speeds, as QuickShots involve dynamic movements that can be impacted by strong gusts. Regularly check your drone’s obstacle avoidance sensors if available, but never solely rely on them.
Optimizing Camera Settings for QuickShots
While QuickShots automate flight, you often still have control over basic camera settings like resolution and frame rate. For the best quality, record in the highest resolution your drone supports (e.g., 4K if available). Be aware that some older DJI drone models might automatically default to 1080p when using QuickShot modes. Adjust your exposure manually before starting the QuickShot, especially if there’s a significant change in lighting during the maneuver. Setting your white balance correctly will also ensure natural-looking colors.
Post-Production Enhancements
The raw footage captured by QuickShots is a fantastic starting point. Don’t hesitate to take it into editing software to:
- Trim and Crop: Refine the beginning and end of the clip for a cleaner look.
- Color Grade: Apply color corrections and creative grades to match your desired aesthetic.
- Add Music and Sound Effects: Enhance the emotional impact and professional feel of your video.
- Stabilize: While QuickShots are generally smooth, additional stabilization can refine any minor jitters.
- Speed Ramps: Introduce slow-motion or speed-up effects for added drama.
Practice Makes Perfect
Like any skill, mastering QuickShots benefits from practice. Start in open, controlled environments to get a feel for each mode and its capabilities. Experiment with different distances, heights, and subjects. Review your footage critically to understand what works best and how to improve your composition and execution for future flights. The more you use them, the more intuitive and powerful QuickShots will become in your drone videography toolkit.
Conclusion
Drone QuickShots like Dronie, Helix, and Rocket are revolutionary tools that democratize cinematic aerial videography. They empower pilots of all skill levels to capture complex, professional-grade footage with remarkable ease. By understanding each mode’s unique flight path, knowing when to deploy them, and following best practices for safety and camera settings, you can elevate your drone content from ordinary to extraordinary. These intelligent flight modes save time, inspire creativity, and ensure your aerial stories are told with maximum impact.
So, what incredible views will you capture next with the power of QuickShots?
Frequently Asked Questions
Which DJI drones support QuickShots like Dronie, Helix, and Rocket?
Most modern DJI drones, including models from the Mavic, Mini, Air, and Spark series, support QuickShot modes. The specific available QuickShots may vary by drone model, but Dronie, Helix, and Rocket are commonly found across many popular consumer and prosumer drones. Always check your drone’s specifications and the DJI Fly app for your particular model.
Can I adjust the speed or duration of a QuickShot?
While QuickShots are largely automated, you often have control over parameters like the maximum flight distance or height, which indirectly influences the shot’s duration and how expansive the movement is. For instance, setting a higher limit for a Dronie or Rocket shot will make the drone fly further and longer. The speed itself is typically predetermined by the drone’s intelligent flight algorithms for optimal cinematic effect.
What are common mistakes to avoid when using QuickShots?
Common mistakes include flying in areas with insufficient clear space, not verifying battery levels, failing to properly select and track the subject, and attempting QuickShots in challenging weather conditions like strong winds. Always ensure a clear flight path, monitor your drone throughout the maneuver, and be prepared to cancel if any unforeseen obstacles arise.
Do QuickShots use the drone’s obstacle avoidance sensors?
Yes, drones equipped with obstacle avoidance sensors typically utilize them during QuickShot maneuvers to help prevent collisions. However, these sensors have limitations (e.g., blind spots, performance in low light, or with thin objects like power lines). It is crucial to always fly in open environments and maintain visual line of sight with your drone, never solely relying on obstacle avoidance for safety.