The world of FPV (First Person View) drones offers an exhilarating blend of speed, agility, and aerial artistry. But for your FPV drone to truly sing in the sky, responding to your every command with precision and grace, you need to understand the art and science of PID tuning. Often seen as a mysterious dark art, PID tuning is, in fact, the fundamental process that optimizes your drone’s flight characteristics, transforming a merely airborne quad into a perfectly integrated extension of your will. This guide will demystify PID, breaking down its components, explaining its profound impact on your flying experience, and offering a simplified approach to tuning your FPV drone for peak performance.
Understanding PID Tuning: The Brain of Your FPV Drone
What is PID? A Look at the Core Algorithm
At its heart, PID stands for Proportional, Integral, and Derivative—a powerful control algorithm embedded within your FPV drone’s flight controller software. This algorithm tirelessly processes data from onboard sensors and translates your radio stick commands into precise adjustments of motor speeds. Its primary goal is to ensure your drone rotates at the desired rate, maintaining stability and executing maneuvers flawlessly.
To grasp PID fully, it’s helpful to understand a few key terms. The “set-point” refers to the rotational rate you desire, dictated by your stick inputs. The “error” is the crucial difference between this desired set-point and the actual rotational rate measured by the gyro sensor. The “control loop” is the continuous cycle where the flight controller reads sensor data, calculates this error, and then adjusts motor speeds to minimize it, sometimes performing thousands of these calculations per second.
The History and Evolution of PID in Drones
In the early days of FPV, PID tuning was an absolute necessity. Flight controller firmware was rudimentary, and default PID values often resulted in poor flight performance. Pilots had to meticulously tweak settings just to get their drones to fly acceptably. Thankfully, advancements in modern flight controller software, coupled with sophisticated noise filtering and optimized algorithms, mean that many FPV drones can now fly reasonably well even with default settings.
However, “reasonably well” is rarely the goal for a passionate FPV pilot. While current technology has made basic flight more accessible, PID tuning remains essential for transforming a drone that “flies well” into one that “flies perfectly” according to your unique flying style. It’s the difference between merely staying aloft and achieving unparalleled responsiveness, stability, and handling that truly unlocks your drone’s potential.
The Three Pillars: Proportional, Integral, and Derivative Gains
The PID algorithm is composed of three distinct terms—Proportional (P), Integral (I), and Derivative (D)—each playing a unique role in shaping your drone’s flight characteristics. Users assign a “gain” to each term, which determines its influence on the control system.
Proportional (P) Gain
The Proportional (P) gain relates directly to the present error. It dictates the intensity with which your flight controller works to correct any deviation from your desired set-point. Think of P-gain as the responsiveness setting: a higher P-value makes your quadcopter feel more “locked-in” and snappy, reacting quickly to your stick inputs.
However, there’s a delicate balance. If the P-gain is set too high, the drone will over-correct, leading to sharp “bounce-backs” after flips and rolls, or even rapid, high-frequency oscillations. Conversely, a P-gain that is too low will make the quadcopter feel sluggish, unresponsive, and “sloppy.”
Integral (I) Gain
The Integral (I) gain accumulates past errors. Its primary role is to maintain the drone’s attitude and position against persistent external forces, such as sustained wind or an off-centered center of gravity (CG). It essentially helps the drone “remember” past deviations and apply continuous correction to hold its desired orientation.
A well-tuned I-gain will prevent your drone from drifting and ensure it holds its angle solidly. If I-gain is too low, you might notice the quadcopter feeling “drifty” in the wind, exhibiting wobbles or “nose dips” during rapid throttle changes, and requiring constant pilot input to stay on target. On the other hand, an I-gain that is excessively high can lead to sluggishness, and in extreme cases, cause slow, low-frequency oscillations or bounce-backs, making the drone feel overly rigid.
Derivative (D) Gain
The Derivative (D) gain is a forward-looking term that anticipates future errors and acts as a dampening mechanism for the P-gain. It helps prevent overshoots caused by the P-term, much like a shock absorber dampens suspension bounce in a car. D-gain is crucial for attenuating undesirable flight characteristics such as propwash, wind-induced wobbles, or bounce-backs after aggressive maneuvers.
If D-gain is too low, your quadcopter will exhibit significant bounce-backs after performing flips and rolls and will experience worse propwash oscillations during vertical descents. Conversely, an excessive D-gain can amplify vibrations and noise within the quadcopter, resulting in “trilling” oscillations, potentially overheating your motors, and making the drone feel mushy or unresponsive. It is crucial to address high-frequency gyro noise with proper filtering before increasing D-gain, as the D-term can magnify this noise, causing motor damage.
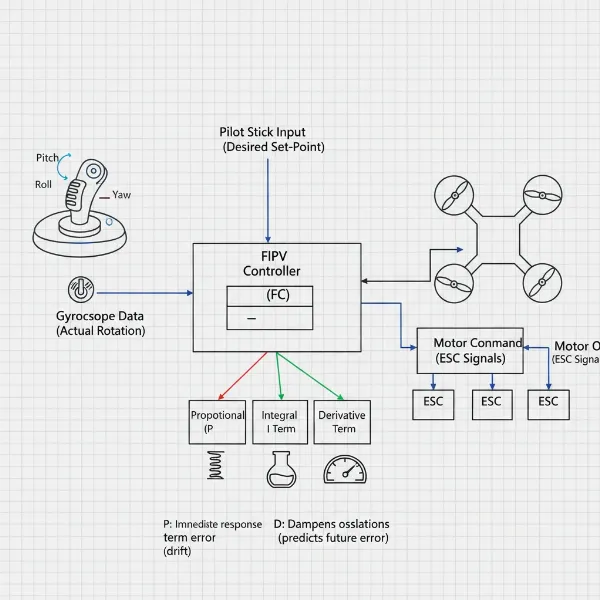 Diagram showing Proportional, Integral, Derivative control loop for an FPV drone.
The Impact of PID on FPV Drone Performance
The synergistic interaction of the P, I, and D gains fundamentally shapes how your FPV drone performs in the air. Achieving the right balance is like finding the perfect symphony for your quadcopter’s motors.
Enhanced Responsiveness and Precision
When PID gains are finely tuned, your drone feels incredibly responsive and “locked-in.” It tracks your stick movements with minimal delay, providing a direct connection between your commands and the drone’s aerial ballet. This precision is vital for executing complex freestyle tricks, hitting race gates with accuracy, or capturing buttery-smooth cinematic footage. The goal is to eliminate any feeling of sloppiness or sluggishness, giving you absolute confidence in your drone’s reactions.
Stability in Challenging Conditions
A well-tuned PID system significantly enhances your drone’s ability to maintain stability, particularly when battling external disturbances. The I-term, in particular, empowers the flight controller to actively resist forces like wind gusts and small shifts in the center of gravity, keeping your drone locked onto its intended path. This means less fighting the drone and more focusing on your flight path, even in less-than-ideal weather.
Eliminating Oscillations and Wobbles
One of the most immediate benefits of proper PID tuning is the elimination of unwanted oscillations, wobbles, and “bounce-backs.” These irritating symptoms are often direct indicators of PID gains being too high or too low, or an imbalance between the terms. By systematically adjusting P, I, and D, you can achieve a clean, smooth flight that not only feels better but also looks pristine in your FPV feed and recorded video. A drone free of oscillations is also a drone that places less stress on its components, potentially extending its lifespan.
Beyond PID: Understanding Related Flight Controller Settings
While PID is the core, several other flight controller settings in firmware like Betaflight work in conjunction with PID to refine your drone’s flight characteristics.
- Feedforward: This advanced feature helps your drone react faster by anticipating your stick movements. Instead of solely reacting to the “error” (like P-gain), Feedforward observes how quickly you move the sticks and initiates motor responses earlier. This significantly reduces the delay between your input and the drone’s actual movement, leading to a more direct and instantaneous feel. However, too much Feedforward can cause bounce-backs, similar to excessive P-gain.
- Anti Gravity (AG): Designed to combat “nose dips” during rapid throttle changes, Anti Gravity temporarily boosts P and I gains when you quickly increase or decrease throttle. This momentary increase in control authority helps the drone maintain its attitude and stability during aggressive throttle inputs.
- I Term Relax: When performing sharp acrobatic maneuvers, the I-term can sometimes “wind up,” causing slow bounce-backs as the drone tries to settle. I Term Relax suppresses the I-term during these aggressive stick movements, preventing this undesirable behavior and allowing for cleaner stops and transitions.
- Dynamic Damping: This feature dynamically adjusts the D-gain. It can boost the D-gain during sharp stick movements to improve propwash handling, while keeping it lower during cruising flight to help keep motors cool. However, its effectiveness can vary depending on how quickly the drone detects and responds to these sharp movements.
- Rates and Expo: While not directly part of the PID loop, Rates and Expo are crucial for defining your drone’s stick sensitivity and maximum rotational speeds. RC Rate determines how quickly your drone rotates at full stick deflection, while Expo softens the stick response around the center, making small corrections smoother. Super Rate further refines this curve. These settings are highly personal and allow you to tailor the “feel” of your controller to your flying style.
- Filters (Gyro & D-Term): Filters are foundational to good PID tuning. They are responsible for cleaning up raw sensor data (especially from the gyro) by removing high-frequency noise and vibrations before it reaches the PID controller. Excessive noise can make PID tuning impossible, leading to hot motors and erratic flight. Proper filtering ensures that the PID algorithm receives clean, actionable data.
A Simplified Approach to PID Tuning in Betaflight
Achieving a great tune doesn’t always require a Blackbox (though it’s ideal for perfection). With careful observation and systematic adjustments, you can significantly improve your FPV drone’s flight performance. Here’s a simplified process using the Betaflight Configurator:
Preparatory Steps
Before you even touch a slider, ensure your drone and environment are ready:
- Backup Current PID Values: Always save your current PID settings. This provides a safety net if things go awry and a benchmark for comparison.
- Tune in Acro Mode: Perform all tuning in Acro (Rate) mode. This ensures you’re observing the drone’s raw response to your inputs without any auto-leveling features interfering.
- Balance Center of Gravity (CG): A properly balanced drone flies better inherently. Adjust your battery placement to ensure the CG is as centered as possible.
- Use New, Balanced Propellers: Damaged or unbalanced propellers introduce vibrations that can mask PID issues or lead to false tuning. Start with fresh props.
- Basic Configurations: Ensure your Betaflight firmware is updated, RPM filters are enabled, and ESC settings are optimized. Use a 4KHz PID Loop frequency and DShot300 ESC Protocol for a solid foundation.
Isolating P and D Gains
This crucial step helps establish the correct ratio between your P and D terms before maximizing overall gains. In Betaflight Configurator:
- Disable Related Features: Temporarily set “Stick Response” (Feedforward) to 0, “Dynamic Damping” to 0, and “Drift Wobble” (I gain) to 0. Also, turn off “I Term Relax” and “Anti Gravity.” This isolates P and D for a cleaner tuning experience.
- Adjust Damping Slider: Perform flips and rolls, looking for “overshoot” – a slight bounce-back at the end of the maneuver. Start by moving the “Damping” slider down until you clearly see/hear overshoot. Then, gradually move it back up one or two notches until the overshoot is minimized. This action helps determine the optimal P/D ratio for your quad. Once found, try to maintain this balance.
Maximizing PID Gains
Once your P/D balance is set, you can increase the overall responsiveness:
- Increase Master Multiplier: Slowly move the “Master Multiplier” slider up one click at a time. After each adjustment, perform a 30-second test flight with some aggressive acro maneuvers, paying close attention to motor temperature. This increases all PID gains proportionally, making your quadcopter feel more locked-in and improving propwash handling.
- Monitor for Issues: Stop increasing if you notice any of these signs:
- Motors becoming excessively hot.
- Motors making strange grinding or high-pitched “trilling” sounds.
- The quadcopter becomes erratic or uncontrollable, especially upon arming.
Finding I Gain
Now, reintroduce the I-term:
- Re-enable Drift Wobble: Set the “Drift Wobble” slider back to 1.
- Adjust I Gain: Perform horizontal descents and general cruising. If the quad feels “drifty” or has poor attitude hold in wind, slowly increase the I-gain. If you notice slow oscillations or sluggishness, decrease it. For many powerful 5-inch quads, the default I-gain in Betaflight is often a good starting point and may not require significant changes.
Refining with Advanced Features
Once the core PID is dialed in, you can fine-tune with the additional settings:
- Anti Gravity & I Term Relax: Enable these features. Adjust Anti Gravity gain slightly if you still experience nose dips during rapid throttle changes (e.g., from default 3.5 to 4-6). If you still have slow bounce-backs after flips/rolls with I-gain reintroduced, try lowering the “cut off” value for I Term Relax.
- Feedforward: Gradually increase the “Stick Response” slider. Look for faster, more direct responsiveness without introducing new bounce-backs. Find a balance that feels good to you.
- Dynamic Damping: If you experience propwash issues or hot motors during aggressive freestyle, experiment with Dynamic Damping. It can boost D-gain during sharp moves to help, but ensure it doesn’t cause motor overheating or bad sounds.
- Rates and Expo: Finally, fine-tune your RC Rate, Super Rate, and Expo settings in the Rates tab to achieve the desired stick sensitivity and maximum rotation speeds that match your personal flying style.
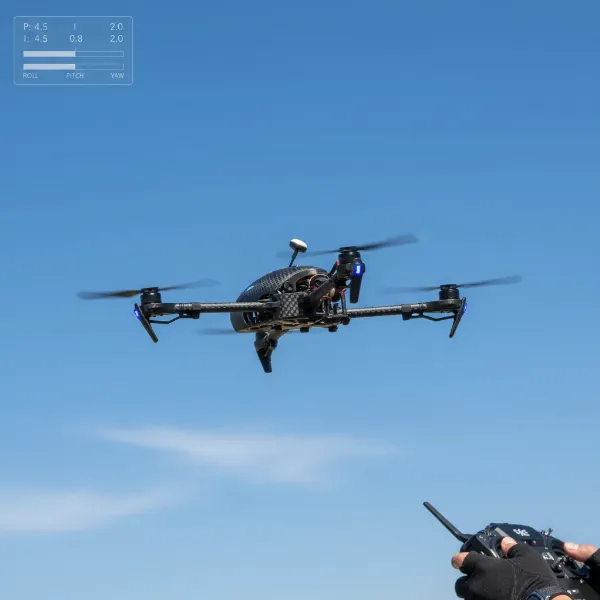 FPV drone flying smoothly and precisely after successful PID tuning.
Troubleshooting Common FPV Drone Flight Issues
Sometimes, issues aren’t purely PID-related. Before diving deep into PID adjustments, consider these common troubleshooting points:
- Shakes and Jello: Often, camera jello or general shakes are mechanical. Check for damaged or unbalanced propellers, loose motor bearings, incorrectly soft-mounted flight controllers, or even the camera’s mounting. Ensure your ESC has a low ESR capacitor.
- Oscillation at High Throttle: If oscillations appear only at higher throttle levels, “Throttle PID Attenuation” (TPA) can be your solution. TPA reduces D-gain (and sometimes P-gain, depending on Betaflight version) above a certain throttle threshold, preventing high-throttle oscillations while allowing for higher PID gains at lower throttle.
- Reducing Propwash: Propwash—the wobbles experienced in dirty air, often during rapid descents—can be minimized by:
- Reducing filtering as much as possible to decrease latency and allow higher D-gain.
- Increasing PID gains to their maximum stable values for better setpoint tracking.
- Using 24KHz PWM frequency in BLHeli ESCs.
- Employing lighter propellers.
- Using more powerful motors.
- Making your quadcopter lighter overall.
When to Re-tune Your PID Settings
PID tuning isn’t a one-and-done process. Your optimal settings can change due to various factors:
- Hardware Changes: Any significant alteration to your drone’s hardware, such as switching to a different battery, adding a GoPro camera, changing motors or propellers, or even a new frame, will likely necessitate revisiting your PID tune. These changes affect the drone’s weight, thrust-to-weight ratio, and mass distribution.
- Environmental Factors: External conditions like strong wind, varying humidity, or significant changes in altitude can also influence how your drone flies and how effective your PID settings are.
In essence, whenever you make a substantial change to your FPV drone or your flying environment, it’s a good idea to at least check your PID values and adjust them as needed to maintain optimal performance.
Conclusion
Mastering PID tuning is an essential skill that empowers you to unlock the full potential of your FPV drone. By understanding the intricate roles of P, I, and D gains and their impact on your drone’s behavior, you can tailor its responsiveness and stability to perfectly match your unique flying style. Remember that tuning is an iterative process, a dialogue between you, your drone, and the sky. Embrace the experimentation, observe carefully, and don’t forget to consider hardware and environmental factors. With this knowledge, you’re now equipped to transform your FPV drone from a mere machine into a perfectly tuned, high-performing extension of your will, ready to deliver an unparalleled flying experience.
What flight characteristic are you most eager to refine through PID tuning?
Frequently Asked Questions
What does “locked-in” mean in FPV?
“Locked-in” describes an FPV drone that feels incredibly precise and responsive to pilot inputs. It reacts instantly to stick movements, holding its desired angle and position without wobbles, drift, or sluggishness, giving the pilot a strong sense of control and confidence.
Can I use default PID settings for my FPV drone?
Modern flight controller firmware often provides default PID settings that allow drones to fly reasonably well. However, for optimal performance, stability, and responsiveness tailored to your specific drone build and flying style, fine-tuning your PID settings is highly recommended.
What are the signs of a bad PID tune?
Signs of a bad PID tune include oscillations (fast or slow wobbles), “bounce-backs” after flips or rolls, persistent drift, sluggish or unresponsive control, propwash issues, and motors overheating or making grinding noises during flight.
Is Blackbox necessary for PID tuning?
While Blackbox logging provides the most accurate data for precise PID and filter tuning, it is not strictly necessary. You can achieve a very good tune by carefully observing your drone’s flight behavior through your FPV goggles and listening to motor sounds, especially for beginners and intermediate pilots.